Spring Flooring Trends: What’s Transforming Homes in 2026
Spring has a way of making everything feel possible again. The windows are open, the light lingers a little longer in the evenings, and suddenly that worn-out flooring you have been “meaning to replace” feels impossible to ignore. If you have been thinking about upgrading your home flooring, 2026 is delivering some of the most exciting and livable trends we have seen in years.
This season is not about flashy, over-the-top statements. Instead, it is about warmth, texture, health-conscious materials, and practical performance that fits real life. At Floorz To Your Doorz, we are seeing homeowners lean into floors that feel grounded, natural, and tailored to the way they actually live. Even better, you do not have to navigate these decisions alone. With professional recommendations, high-quality materials, and the convenience of traveling directly to your residence, choosing the right flooring has never felt more approachable.
Let’s take a closer look at the 5 biggest spring flooring trends shaping homes this year.
Warm “Organic” Neutrals Take Center Stage
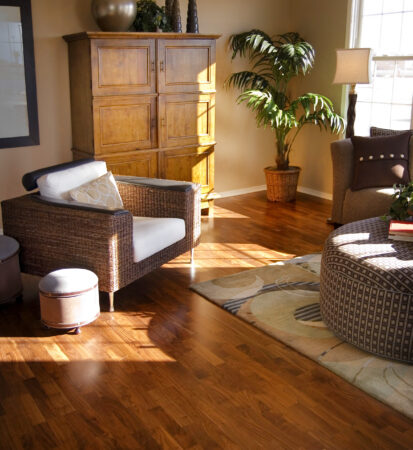
If you remember the cool gray craze of the past decade, you are not alone. For years, gray flooring dominated showrooms and remodels alike. However, spring 2026 has officially turned the page. Today’s homeowners are gravitating toward tones that mirror the natural world and create a sense of comfort.
Honey oak, caramel tones, sandy beige, creamy whites, and warm greige are leading the charge. These shades bring depth and softness into a space, instantly making rooms feel more welcoming. Rather than feeling stark or sterile, they create an inviting foundation that works beautifully with everything from modern minimalism to cozy farmhouse style.
One of the biggest benefits of these organic neutrals is how they interact with spring sunlight. As the days grow brighter, these warmer hues reflect light in a way that makes rooms feel lighter and more expansive. Instead of bouncing light harshly, they diffuse it gently, enhancing that open, airy feeling so many homeowners crave this time of year.
At Floorz To Your Doorz, we often recommend bringing samples directly into your home so you can see how honey oak or warm greige looks in your actual lighting. Professional recommendations matter, especially when subtle undertones can shift dramatically between a showroom and your living room. Seeing those caramel tones against your cabinetry and wall color ensures you choose a floor that truly complements your space.
Nature-Inspired Textures That Feel as Good as They Look
Color may set the mood, but texture brings a floor to life. This spring, homeowners are looking beyond smooth, glossy surfaces and embracing tactile finishes that add dimension and character.
Wire-brushed hardwood, hand-scraped textures, matte finishes, and low-sheen surfaces are in high demand. These finishes echo the feel of natural wood while adding visual interest you can both see and feel underfoot. When you walk across a wire-brushed hardwood floor, there is a subtle texture that makes the material feel authentic and grounded.
Matte and satin finishes are especially popular for active households. From a practical standpoint, they are incredibly forgiving. High-gloss floors tend to highlight every speck of dust, every footprint, and every strand of pet hair. In contrast, low-sheen surfaces are much more active-home friendly. They hide everyday wear far better, which means your floors look cleaner between cleanings.
This is a detail we emphasize often when working with families. A beautiful floor should not require constant maintenance to look good. By recommending matte finishes or hand-scraped textures, Floorz To Your Doorz helps homeowners choose options that balance style with real-world performance. Since we travel to your residence, we can evaluate traffic patterns, pets, and lifestyle factors to guide you toward the most suitable finish.
Large-Format and Wide-Plank Layouts for a Seamless Look
Another standout trend this spring is scale. Larger formats are redefining how spaces feel, especially in open-concept homes.
Wide-plank hardwood, typically ranging from 7 to 10 inches, is becoming a go-to choice for homeowners seeking a modern, seamless look. These wider boards reduce the number of seams across the floor, which in turn minimizes visual clutter. The result is a cleaner, more expansive appearance that flows effortlessly from room to room.
Large-format porcelain tile is also gaining traction, particularly in kitchens and bathrooms. Fewer grout lines create a smoother visual transition, making smaller spaces feel larger and more cohesive. In open-concept living areas, seamless transitions between flooring materials are a top priority. Homeowners want their spaces to feel unified rather than segmented.
Wide planks also showcase the natural grain patterns of the wood in a way narrower boards simply cannot. Those elongated lines highlight the character of the material, giving your home a high-end, custom feel. It is a subtle design choice that has a major impact.
At Floorz To Your Doorz, we walk homeowners through layout options and explain how plank width and tile size can influence the perception of space. Professional recommendations are especially valuable here, because selecting the right size for your square footage and layout can dramatically enhance the final result.
Eco-Conscious and Health-First Materials
Sustainability is no longer a niche request. In 2026, it is an expectation. Homeowners are increasingly asking where their flooring comes from and how it impacts both the planet and their indoor air quality.
Carbon-neutral flooring options, low-VOC finishes, FSC-certified hardwood, and renewable materials like cork or bamboo are becoming standard considerations rather than specialty upgrades. These materials offer the beauty and durability homeowners want while supporting responsible sourcing and reduced environmental impact.
There is also a growing focus on indoor health. Spring often brings seasonal allergies, and many people find themselves spending more time indoors to escape pollen. Low-emission flooring plays an important role in creating a detoxed home environment. Floors with low-VOC finishes help minimize airborne irritants, contributing to cleaner indoor air.
This health-first approach resonates strongly with families and anyone sensitive to allergens. When selecting flooring, it is no longer just about how it looks. It is about how it supports your well-being.
Floorz To Your Doorz prioritizes quality materials that meet these evolving standards. Because we bring options directly to your home, you can review product details, certifications, and finishes in a relaxed setting. Our team provides professional recommendations tailored to your priorities, whether that means focusing on renewable cork, FSC-certified hardwood, or the latest low-VOC engineered wood.
High-Performance Hybrids for Real-Life Living
While aesthetics and sustainability are essential, performance remains a top concern. That is where high-performance hybrids come into play. In fact, hybrid resilient flooring is shaping up to be one of the breakout stars of 2026.
Hybrid resilient flooring, waterproof engineered wood, and stone-look LVT are redefining what homeowners expect from their floors. These products combine the dent resistance of laminate with the waterproof nature of vinyl, delivering a modern solution for busy households.
Spring brings muddy footprints, spilled drinks, and increased foot traffic as families move in and out of the house more frequently. Hybrid resilient flooring handles these challenges with ease. It resists moisture, withstands dents, and maintains its appearance even in high-traffic areas like entryways and kitchens.
Waterproof engineered wood is another popular choice for homeowners who love the look of real wood but need added protection. Meanwhile, stone-look LVT provides the visual appeal of natural stone without the cold feel or maintenance demands.
At Floorz To Your Doorz, we often describe these options as the best of both worlds. You get the warmth and style of traditional materials combined with next-generation durability. Because we travel to your residence, we can assess your subfloor conditions and lifestyle needs to recommend the right hybrid solution for your home.
Bringing It All Together for Your Spring Refresh
Spring is a season of renewal, and your floors play a bigger role in your home’s transformation than you might think. From warm organic neutrals and nature-inspired textures to wide-plank layouts, eco-conscious materials, and high-performance hybrids, 2026 is all about blending beauty with livability.
The key is choosing flooring that aligns with your style, your routine, and your long-term goals. That is where expert guidance makes all the difference. Floorz To Your Doorz offers professional recommendations, high-quality materials, and the convenience of bringing the showroom directly to you. By seeing options in your own lighting and space, you can make confident decisions that truly enhance your home.
If you are ready to upgrade your home flooring this spring, now is the perfect time to explore these trends. With the right materials and thoughtful guidance, your new floors can transform not just how your home looks, but how it feels every single day.


